Tag Archives: mac

How to fix “ghost” files in the Finder

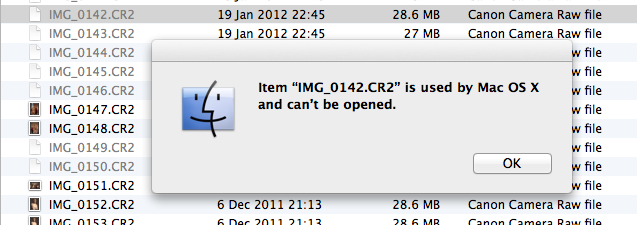
Sometimes the Mac Finder can get its knickers in a twist about files that you *ought* to be able to open just fine but Finder says no. You may see a message that says “Item XYZ is used by Mac OS X and can’t be opened.”

This can happen if the Finder is in the middle of a copy and the source disk is suddenly disconnected. During a copy the Finder sets a special type/creator code on files, and when the copy completes the proper type/creator code is restored. But if the copy is interrupted then sometimes instead of recovering gracefully the Finder leaves the files with their temporary attributes.

So if you do have these “ghost” files, here is a bit of command-line magic to remove the Finder’s temporary attributes (you would need to change the “`/path/to/files`” bit):

mdfind -onlyin /path/to/files -0 “kMDItemFSTypeCode==brok && kMDItemFSCreatorCode==MACS” | xargs -0 -n1 xattr -d com.apple.FinderInfo

(This is a single command, all on one line, which you type in Terminal.app.)

What this does is use [the Spotlight tool][mdfind] to find only files that have a Mac file type of “brok” and a creator code set to “MACS”. Then for each file we remove the Finder attributes (which means the Finder reverts to using the file-name’s extension when deciding how to open a file).

The `-onlyin` flag is used to restrict the search to a particular folder and its sub-folders, a belt and braces approach to making sure we only fix the files we are interested in.

This post was suggested by [@hobbsy][hobbsy], who had probs with RAW pictures he had copied across disks.

Although the way I showed him how to do this originally was needlessly convoluted because I forgot what one can do with `mdfind`.

Although the way I showed him how to do this was so much simpler because it was wrapped in a drag-and-drop Mac application created using [Sveinbjörn Þórðarson’s Platypus][playtpus], so no need to type the wrong thing into the shell and accidentally delete everything.

[hobbsy]: http://twitter.com/hobbsy
[playtpus]: http://sveinbjorn.org/platypus/
[codes]: http://arstechnica.com/staff/2009/09/metadata-madness/
[mdfind]: https://developer.apple.com/library/mac/#documentation/Darwin/Reference/ManPages/man1/mdfind.1.html

SharpZipLib and Mac redux

I wrote a blog about [generating Mac-compatible zip files with SharpZipLib][1], the conclusion of which was to disable Zip64 compatibility. It was wrong, *wrong* I tell you.

The better solution is to just set the size of each file you add to the archive. That way you can keep Zip64 compatibility and Mac compatibility.

I owe this solution to the excellent SharpZipLib forum, [which covered this problem a while ago][2], but which I missed when I wrote the earlier blog.

Here’s an updated version of the zip tool in C# that makes Macs happy without annoying anyone else:

using System;
using System.IO;
using ICSharpCode.SharpZipLib.Core;
using ICSharpCode.SharpZipLib.Zip;

public class ZipTool
{
public static void Main(string[] args)
{
if (args.Length != 2) {
Console.WriteLine(“Usage: ziptool “);
return;
}

using (ZipOutputStream zipout = new ZipOutputStream(File.Create(args[1]))) {
byte[] buffer = new byte[4096];
string filename = args[0];

zipout.SetLevel(9);

// Set the size before adding it to the archive, to make your
// Mac-loving hippy friends happy.
ZipEntry entry = new ZipEntry(Path.GetFileName(filename));
FileInfo info = new FileInfo(filename);
entry.DateTime = info.LastWriteTime;
entry.Size = info.Length;
zipout.PutNextEntry(entry);

using (FileStream fs = File.OpenRead(filename)) {
int sourceBytes;
do {
sourceBytes = fs.Read(buffer, 0, buffer.Length);
zipout.Write(buffer, 0, sourceBytes);
} while (sourceBytes > 0);
}

zipout.Finish();
zipout.Close();
}
}
}

[1]: http://reliablybroken.com/b/2011/11/sharpziplib-and-mac-os-x/
[2]: http://community.sharpdevelop.net/forums/p/4982/18649.aspx#18649

SharpZipLib and Mac OS X

TL;DR When creating zip archives with SharpZipLib disable Zip64 format if you care about Mac compatibility.

Extra TL;DR [When creating zip archives with SharpZipLib make sure you set the file size][redux], disabling Zip64 is neither here nor there.

A project I am working on sources a zip archive from a Web service, extracts the XML file from the zip and then does silly amounts of processing of the data in that XML to produce a new XML file which is returned to the user.

But the sourced zip archive cannot be opened using [Python’s zipfile module][zipfile], and when saved on a Mac the archive cannot be opened using the built-in Archive Utility.app. If one double-clicks the zip, Archive Utility.app just compresses it again and sticks “.cpgz” on the end of the file name.

Fortunately the developer of the Web service is very helpful (the service is written in C# and runs on Windows) and although he didn’t know why Macs were having problems (the built-in Windows zip tool can handle the archive fine) he showed me the code that creates the zip file.

Turns out they were using [SharpZipLib, an open-source library for C#][sharpziplib]. And it turns out SharpZipLib creates archives using [Zip64 format][zip64] by default.

The fix was to disable Zip64 when creating the archive. Here’s a trivial command-line program that creates a zip and disables Zip64 for Mac compatibility:

using System;
using System.IO;
using ICSharpCode.SharpZipLib.Core;
using ICSharpCode.SharpZipLib.Zip;

public class ZipTool
{
public static void Main(string[] args)
{
if (args.Length != 2) {
Console.WriteLine(“Usage: ziptool “);
return;
}

using (ZipOutputStream zipout = new ZipOutputStream(File.Create(args[1]))) {
byte[] buffer = new byte[4096];
string filename = args[0];

zipout.SetLevel(9);

// Disable Zip64 for Mac compatibility
zipout.UseZip64 = UseZip64.Off;

ZipEntry entry = new ZipEntry(Path.GetFileName(filename));
entry.DateTime = File.GetLastWriteTime(filename);
zipout.PutNextEntry(entry);

using (FileStream fs = File.OpenRead(filename)) {
int sourceBytes;
do {
sourceBytes = fs.Read(buffer, 0, buffer.Length);
zipout.Write(buffer, 0, sourceBytes);
} while (sourceBytes > 0);
}

zipout.Finish();
zipout.Close();
}
}
}

The disadvantage of disabling Zip64 is you cannot create archives larger than 4 gigabytes, nor can you add files larger than 4 gigabytes before compression.

The advantage of disabling Zip64 is you make me and all my Mac-using hippy friends happy. In concrete terms, disabling Zip64 makes it more likely I will buy you a drink.

Hi Gaston!

Also many thanks to the maintainer of NAnt in [MacPorts][macports], who responded to [my bug report][bug] and pushed an updated NAnt to MacPorts extremely quickly. Although SharpZipLib doesn’t officially support [Mono][mono], it builds without a hitch using the “build-net-2.0” target if you hack the `SharpZlib.build` NAnt script like so:


Also thanks to the Mono project! Saved me having to fire up a Windows virtual machine to figure out this problem.

[zipfile]: http://docs.python.org/library/zipfile.html
[sharpziplib]: http://www.icsharpcode.net/opensource/sharpziplib/
[zip64]: http://en.wikipedia.org/wiki/ZIP_(file_format)#ZIP64
[macports]: http://www.macports.org/
[bug]: http://trac.macports.org/ticket/32097
[mono]: http://www.mono-project.com/
[redux]: http://reliablybroken.com/b/2011/12/sharpziplib-and-mac-redux/

Lion: Spotlight still broken

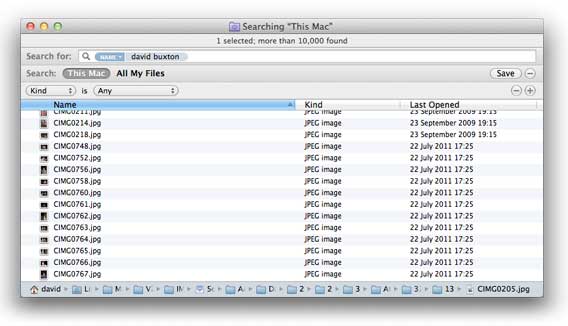
I’ve installed [Mac OS X 10.7][lion] (upgrading from 10.6) and was very interested to see how the new search tokens feature would work in Spotlight. But on my Mac it doesn’t. Here’s the result of a search for files whose name contains the text “david buxton”:

Note how none of the files in that list has a name containing the text “david buxton”.

Perhaps deleting the Spotlight index would fix things. Meh.

[lion]: http://www.apple.com/pr/library/2011/06/06Mac-OS-X-Lion-With-250-New-Features-Available-in-July-From-Mac-App-Store.html

VCS for Cocoa Programming for Mac OS X

I am working my way through [Aaron Hillegass][aaron]’ [Cocoa Programming for Mac OS X][cocoa] (again). I find it a good book, despite the fact I’ve started it twice before and have abandoned my tuition twice before. I like to think my progression is an awful lot like young [Luke Skywalker recklessly abandoning his Jedi training][luke] on Dagobah in order to save his Web application friends in the cloud city called Bespinternet. Eventually Luke (and I) will go back to complete his (and my) training and will become a truly great Jedi programmer for Mac OS X.

Anyway, for the first few chapters the book leads you through a number of small applications, each exercise starting a new project. Then in the later chapters Hillegass has you adding features to a single project called RaiseMan.

It strikes me that the next edition of the book should introduce using version control to track development.

Many chapters in the book end with challenges that go off on a tangent, getting you to implement alternate approaches to the exercises covered in that chapter. But then the subsequent chapter will expect you to work with the version of the RaiseMan application as it stood before the previous chapter’s programming challenge.

This is a natural fit for revision control (aka [VCS][vcs]). The book would teach you how to tag “release” versions of your code. It would teach you how to create an experimental feature branch for the chapter-end challenges, and then how to resume development from the last “release” version for the next chapter’s main exercises.

This is particularly relevant now that [Xcode 4 includes Git integration][xcodegit]. Of course there is no reason one can’t employ a suitable version control system with the current (third) edition of the book; I just think it makes a lot of sense to get younglings used to this workflow while teaching them all the other stuff about lightsabres and [the Force][rdf] while you’re at it.

You will up-vote this on [Reddit][reddit] / [Hacker News][hn] *(waves hand like her Imperial majesty)*.

[cocoa]: http://www.bignerdranch.com/book/cocoa%C2%AE_programming_for_mac%C2%AE_os_x_3rd_edition
[aaron]: http://www.bignerdranch.com/instructors/hillegass.shtml
[luke]: http://www.youtube.com/watch?v=om6ctZWNw18
[forum]: http://forums.bignerdranch.com/viewforum.php?f=5
[xcodegit]: https://github.com/blog/810-xcode-4-released-with-git-integration
[reddit]: http://reddit.com/
[hn]: http://news.ycombinator.com/
[rdf]: http://www.folklore.org/StoryView.py?project=Macintosh&story=Reality_Distortion_Field.txt
[vcs]: http://en.wikipedia.org/wiki/Revision_control

Weird App Store buttons

Screenshot of `App Store.app` showing title bar buttons out of place.

Why did Apple allow [the new App Store application][appstore] to ignore the [human interface guidelines][buttons]? It isn’t like the toolbar is doing anything radically different to other information browsers, nothing that might warrant exploring new interface ideas.

It just looks odd, an arbitrary inconsistency that would be simple to correct.

[appstore]: http://www.apple.com/mac/app-store/
[buttons]: http://developer.apple.com/library/mac/documentation/UserExperience/Conceptual/AppleHIGuidelines/XHIGWindows/XHIGWindows.html#//apple_ref/doc/uid/20000961-TPXREF51

Running minidlna on Mac

These are my notes on installing [minidlna][minidlna], a [DLNA][dlna] server for Mac OS X. I compiled it from source and installed the supporting libraries from [MacPorts][macports].

Most of this was culled from [a thread on the minidlna forum][forum].

First install each of the following ports. The command for each would be something like `sudo port install libiconv`.

– libiconv
– sqlite3
– jpeg
– libexif
– libid3tag
– libogg
– libvorbis
– flac
– ffmpeg

Then check out the Mac branch of the current minidlna source from the CVS repository.

cvs -d:pserver:[email protected]:/cvsroot/minidlna checkout -r osx_port minidlna
cd minidlna

The current build script appears to miss out pulling in libiconv so I had to edit `configure.ac`, inserting a line to bring in `libiconv`.

AC_CHECK_LIB([iconv], [main],, AC_MSG_ERROR(Cannot find required library iconv.))

Now the build will work. Although I found I needed to run `autogen.sh` twice for it to generate all the necessary files.

source ENVIRONMENT.macports
sh genconfig.sh
sh autogen.sh
sh autogen.sh
./configure
make

This spits out the minidlna executable and a basic configuration file. Copy these to wherever you want them. Edit the `minidlna.conf` file, pointing it at the files you want to serve. There are examples of what to do in that configuration file.

And for testing purposes you can start the server from the build directory.

./minidlna -d -f minidlna.conf

Bingo.

I did try using [ushare][ushare], another DLNA server, but I couldn’t figure out how to persuade my Sony telly to successfully connect to it. So I gave up. I feel it is useful to give up quickly when something doesn’t work until you run out of alternatives, I consider this triage. I also consider my telly’s inability to work with ushare and the fact that the telly will only play a very limited set of video formats a mark against the promise of DLNA.

[minidlna]: http://sourceforge.net/projects/minidlna/
[dlna]: http://www.dlna.org/
[forum]: http://sourceforge.net/projects/minidlna/forums/forum/879956/topic/3412747
[macports]: http://www.macports.org/
[bravia]: http://www.sony.co.uk/hub/bravia-lcd-televisions
[ushare]: http://ushare.geexbox.org/

Mac deployment Wiki

The [OS X Deployment and Management Wiki][wiki], articles about managing and deploying Macintoshes.

Looks like it is the work of [Rusty Myers][rusty] and Nate Walck (so far).

[wiki]: http://www.osxdeployment.info/
[rusty]: http://twitter.com/thespider

Startup times for old Macs

Considering it is only a [PowerPC G4 processor running at 1.5 GHz][mini], I am impressed that my five-year-old little MacMini can go from pressing the on button to the login screen in 45 seconds, of which the first 10 seconds is the system trying to work out from which disk it should boot. (There is only one disk in the mini – you hear me mini? Boot from that one immediately.)

However it is another 15 seconds from login to a usable desktop, running Mac OS X 10.5.8. My [Macintosh Classic][classic] with an 8 MHz 68000 processor is slightly faster booting [System 6.0.8][608]. Both the mini and the classic can run [some version of Eudora][eudora] for e-mail. Neither machine will run Google’s Chrome browser so I reckon it is even splits on which is the more useful.

Also I don’t need an adaptor to plug in the world’s greatest [aircraft carrier masquerading as a keyboard][keyboard] on the classic. Little baby Jesus to think that Apple used to sell their considerably expensive computers with no keyboard, no screen, no graphics card, no memory, no hard disk, just a mouse! Progress means you can buy a new [MacMini][newmini] and it don’t come with a mouse neither.

[mini]: http://www.everymac.com/systems/apple/mac_mini/stats/mac_mini_g4_1.5.html
[classic]: http://apple-history.com/?model=classic
[eudora]: http://lowendmac.com/compact/68ksoftware.shtml
[608]: http://download.info.apple.com/Apple_Support_Area/Apple_Software_Updates/English-North_American/Macintosh/System/Older_System/System_6.0.x/
[keyboard]: http://en.wikipedia.org/wiki/Apple_Extended_Keyboard
[newmini]: http://www.apple.com/macmini/

Running Django on Mac

These are semi-detailed steps for installing all the bits to host a [Django][django] application on [Mac OS X][macosx]. Tested on 10.5, should work perfectly on 10.6.

Use [MacPorts][macports]: relatively easy to install and the best thing is everything is contained in a directory that you can be confident won’t eff up Apple’s stuff and won’t be effed up by Apple’s stuff.

Install Xcode
————-

You need the compiler and bits that are installed with Xcode. If you can’t find your Mac install discs (Xcode is included with every new Mac but not installed) you can [download it from Apple’s developer website][xcode]. Registration is required but is free.

The current version of Xcode is easy to find, while older versions are available in the downloads section under “Developer Tools”. Xcode version 3.1.4 is the last version that will work for Mac OS X 10.5 systems.

Install MacPorts
—————-

MacPorts have a nice pkg installer. You can also build it from source.

curl -O http://distfiles.macports.org/MacPorts/MacPorts-1.9.1-10.5-Leopard.dmg
hdiutil attach MacPorts-1.9.1-10.5-Leopard.dmg
sudo installer -pkg /Volumes/MacPorts-1.9.1/MacPorts-1.9.1.pkg -target /
hdiutil detach /Volumes/MacPorts-1.9.1

If for some reason MacPorts cannot fetch updates you may need to [pull updates by hand][manualports].

Check your $PATH after installing ports to make sure `/opt/local/bin` is in there. If it isn’t your can do `export PATH=/opt/local/bin:/opt/local/sbin:${PATH}` to fix things, and even add taht line to `~/.profile` so that bash picks it up every time (assuming you haven’t switched your shell).

Install software
—————-

The `port` command is used to manipulate the MacPorts installation. Use it to build and install the various bits we need. This takes a while, especially on old PowerPC machines. Make it more exciting by adding the `–verbose` flag. Exciting!

sudo port install python26
sudo port install apache2
sudo port install mysql5-server
sudo port install mod_python26
sudo port install py26-mysql
sudo port install py26-django
sudo port install py26-south

And if you want to hook Django into a network directory then you almost certainly want to use LDAP.

sudo port install py26-ldap

Cool kids these days say use [mod_wsgi][modwsgi] instead of [mod_python][modpython] for hosting Python applications with Apache, but I am not cool (and on 20 September 2010 I couldn’t persuade mod_wsgi to build from MacPorts on a clean installation).

Configuring and starting MySQL
——————————

*UPDATED: [commenter matea][matea] pointed to [Jason Rowland’s MySQL on Mac][jason] posting that includes steps to secure a default installation, so I’ve updated this section with the appropriate steps.*

I always seem to be the only person who cares about non-English visitors… anyway, so I want to have [MySQL][mysql] use UTF8 for everything. Edit the configuration so it does. As root, create a configuration at `/opt/local/var/db/mysql5/my.cnf` with these lines:

[mysqld]
init-connect = ‘SET NAMES utf8’
character-set-server = utf8
collation-server = utf8_general_ci
skip-networking

[mysql]
default-character-set = utf8

One thing about the line `skip-networking` in the configuration file is that it means MySQL will not listen to __any__ network clients, including connections to `127.0.0.1`. Instead clients should connect to `localhost` or they should specify the path to the socket that MySQL uses for communication. If your MySQL “client” is a Django instance running on the same host then that should not be a problem.

Now initialize the database and start the server. (The use of `-w` in the second line tells launchctl to have the database daemon start at boot. If you don’t want to have MySQL running at boot use `-F` to __force__ start just this one time instead of every time.)

sudo -u mysql /opt/local/bin/mysql_install_db5
sudo launchctl load -w /Library/LaunchDaemons/org.macports.mysql5.plist

And let’s check that the server is up and configured right.

/opt/local/bin/mysql5 -e “SHOW variables LIKE ‘%char%'”

You should see a table showing that the character set for the client and server is set to utf8.

Now run the secure installation script for MySQL. This will ask you to set a password for MySQL’s root account (the administrator) and ask whether to remove the test database and anonymous user access (you should do both):

/opt/local/bin/mysql_secure_installation5

Thaz better.

Configuring Postgresql instead of MySQL
—————————————

If you want to use [Postgres][postgres] instead of MySQL then you need a couple different packages out of ports.

sudo port install postgresql84-server
sudo port install py26-psycopg2

Did you know Apple’s management tools use Postgres? Is true.

Configuring Apache to serve a Django project
——————————————–

Let’s suppose your Django project lives under `/Library/WebServer/example.com/myproj`, and the project’s settings file is `/Library/WebServer/example.com/myproj/settings.py`. Here’s how to configure Apache with mod_python to serve your project.

Create a separate site configuration for Apache in `/Library/WebServer/example.com/site.conf`.


SetHandler python-program
PythonHandler django.core.handlers.modpython
SetEnv DJANGO_SETTINGS_MODULE myproj.settings
PythonOption django.root /
PythonDebug On
PythonPath “[‘/Library/WebServer/example.com’] + sys.path”


Order deny,allow
Allow from all

Of course once everything is hunky dory you will go back and edit the site configuration so that `PythonDebug Off`.

And finally tell Apache to use mod_python and read the site configuration. Edit `/opt/local/apache2/conf/httpd.conf` and add a line at the end of the modules like:

LoadModule python_module modules/mod_python.so

And then a line like:

Include /Library/WebServer/example.com/site.conf

Now fire up Apache:

sudo launchctl load -w /Library/LaunchDaemons/org.macports.apache2.plist

MacPorts has a convenient shortcut for this:

sudo port load apache2

You also want to save Apache a little grief by pre-compiling the Python source files for the project:

/opt/local/bin/python2.6 -m compileall /Library/WebServer/example.com

Hope this helps.

[manualports]: http://reliablybroken.com/b/2010/03/using-macports-behind-a-firewall/
[macosx]: http://www.apple.com/macosx/
[django]: http://www.djangoproject.com
[macports]: http://www.macports.org/
[xcode]: http://developer.apple.com/technology/xcode.html
[mysql]: http://www.mysql.com
[postgres]: http://www.postgresql.org
[modwsgi]: http://docs.djangoproject.com/en/dev/howto/deployment/modwsgi/
[modpython]: http://docs.djangoproject.com/en/dev/howto/deployment/modpython/
[matea]: http://reliablybroken.com/b/2010/09/running-django-on-mac/comment-page-1/#comment-1458
[jason]: http://www.jasonrowland.com/2009/10/install-mysql5-on-snow-leopard-using-macports/